
Event notification : Automatic notifications (e-mail and SMS) / My dots
Thanks to the notifications, you are informed at any time of new scheduled tasks or leave requests!
In the Premium version of PlanningPME Web Access, it is possible to configure the sending of automatic notifications by e-mail and/or SMS to users, to resources, and/or to customers according to the filters and defined actions.
How are automatic notifications created?
E-mail notifications
SMS notifications
Selection of the language for each recipient
Notification rights
Examples of notifications
My dots
Activating notifications
Notifications are included in the Premium version of PlanningPME Web Access. By opting for the Premium version, a Notifications menu appears in the Data menu. If you wish to take advantage of this functionality, please feel free to contact us to obtain an estimate.
How are automatic notifications created?
In order to help the creation of your automatic notifications, follow the steps described below. First of all, go to Data menu -> Notifications, then click on Add to create a notification.
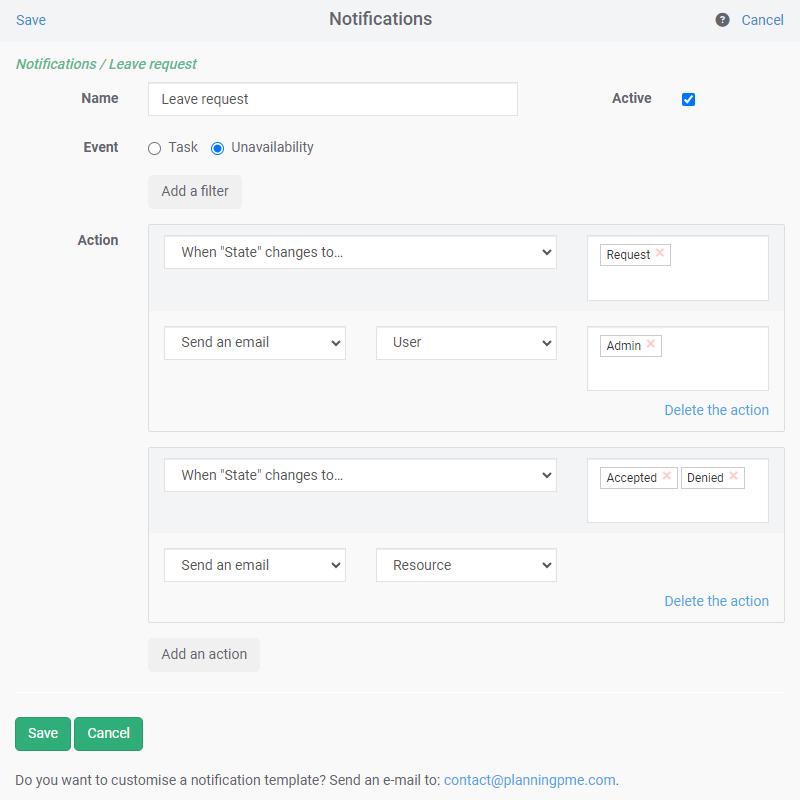
Description of the fields available
Name: Enter your notification label
Event : Choose if your notification concerns events of type Task or type Unavailability..
Filters: For this notification, choose the filter to apply from among the following:
- The label : Is the notification triggered for all event labels or only some of them?
- Resources: Which resources are affected?
- Departments: What are the services affected by the notification?
- Category: What are the different categories of tasks?
- State: What are the task or unavailability status ?
-
When ... : Choose, in the following list, when the notification is sent:
Reminder: Automatically send an email before the beginning or after the end of an event
When the category becomes ...
When the event becomes ...
When the event is created
When the event is changed
When the event is created or changed - Action type : Choose from the following actions: Send by Email or Send by SMS
-
Target types : Creator of the event, user, Resource,Client
Notifcation tab on event window
You can set individual notifications per event from the tab "notification" on the event window.
E-mail notifications
Prerequisites
In order for your different targets (user, resource, and customer) to receive an e-mail, it is essential that the e-mail field be completed in the corresponding user, resource and customer files. Please verify the correct entry of this data.
Selection of the language for each recipient
For each target recipient (resource, customer, and user), you can define a communication language from among the languages available in the application (French, English, Spanish, etc.). The notification will be sent in the language chosen for each target recipient.
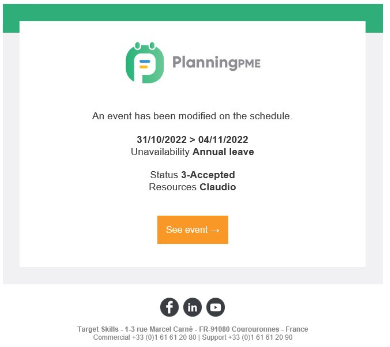
Fields sent
These are the fields sent by default:
- Date
- Label for the task or the unavailability
- State of the task or of the unavailability
- Name of the resources concerned
- See event button : This button only appears in the e-mail if the target is a user or a scheduling resource. By clicking on this button, and if you are a user of the connected schedule, the event will open directly on the schedule on the date of the event in question. If the target is a customer, this button will not appear in the automatic e-mail.
Do you want to customise the template sent by e-mail? It is possible; do not hesitate to contact us to obtain an estimate.
SMS notifications
Prerequisites
The "mobile phone" field of the various targets (resource and customer) must be filled in according to the international format (with the country code) in the corresponding screens so that they can receive an SMS.
Sending via Amazon Web Services
Sending SMS is done by Amazon Web Services, and you must first open an AWS account. Once your account is created, set up the Simple Notification Service and manage the IAM access key. This key must be provided to our technical team when you order in order to activate the sending of SMS on your access. You can then manage your credits and the follow-up of the sendings in the AWS management console.
NB: If you are using another SMS provider, contact us so we can review your development requests.
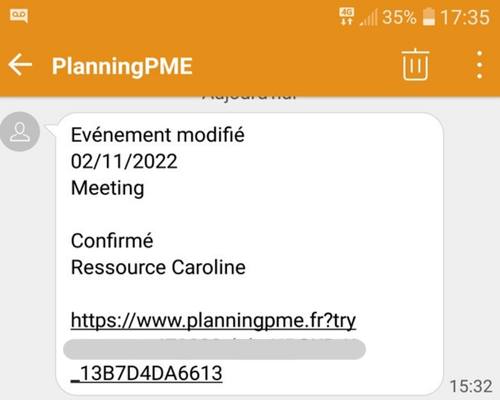
Fields sent
These are the fields sent by default:
- Date
- Label for the task or the unavailability
- State of the task or of the unavailability
- Name of the resources concerned
- Link to the event : The link only appears if the target is a resource. By clicking on this link, and if you are a user of the schedule in question, the event will open the schedule directly at the date of the event in question. If the target is a customer, this button will not appear in the SMS.
Notification rights
The user who creates notifications has capabilities according to his schedule usage rights.
Management at the user group level
You can restrict the access to the notifications management (Data Menu -> Notifications) at the user group level. To do that, you only need to go to the Group Data Menu, then to the General tab, and finally untick the Notification option in the internal settings part of the application.
Restrictions at the level of filters
- Service limitations : the services listed are the services to which the user has read rights.
- Resource limitations : The resources listed are the resources attached to the services to which the user has read rights.
- Label limitations : The labels listed are the labels relating to services to which the user has read rights.
Restricting action levels
- Restricting user targets : if the user has access to rights management, he can choose any user as a target. if the user does not have access to rights management, he can only select his own user name.
Restrictions in access to notifications created by other users
The list of notifications is filtered by user. In fact, a user only sees the notifications that are in accordance with his permissions.
Examples of notifications
Example 1: Leave notifications
Description
When a leave is created on the schedule for a technical service employee, the manager Paul is notified by e-mail.
When the employer accepts or denies the leave (by changing the state of the event), the employee is notified by e-mail.
Settings table
Name:
Technical Service leave notices
Event
Unavailability
Filters
Label = Days Off
Department = Technical service
Actions
Action 1
When the event is created
Action type = Send an e-mail / Target type = User / Choice of user = Paul
Action 2
When the state becomes ... Confirmed; Denied
Action type = send an e-mail / target type = resource
Example 2: Meeting notification
Description
| Name: | Technical Service leave notices |
| Event | Unavailability |
| Filters | Label = Days Off Department = Technical service |
| Actions | Action 1 When the event is created Action type = Send an e-mail / Target type = User / Choice of user = Paul Action 2 When the state becomes ... Confirmed; Denied Action type = send an e-mail / target type = resource |
Example 2: Meeting notification
Description
For all employees of the marketing or sales department: when a meeting is created, edited, or deleted, the employee is notified by e-mail.
In addition, the customer receives an e-mail when the meeting is confirmed.
Settings table
| Name: | Meeting notification |
| Event | Task |
| Filters | Label = Meeting Service = Service marketing; Sales department |
| Actions | Action 1 When the event is created or changed Action type = send an e-mail / target type = resource Action 2 When the state becomes ... confirmed Action type = send an e-mail / target type = Customer |
My dots : notifications in the form of dots and list
A notification informs the user of the creation or modification of a task and/or an unavailability concerning the schedule. Notifications are defined by the user and the latter will be warned, whenever there is a modification, by a dot and by a list.
Configuring notifications by user
To activate this option, go to the Tools menu-> Options -> Event then tick « Activate My dots ». The "My dots" option then appears within the Account menu.
Each user has the ability to configure his/her own notifications. Users may choose the type of notification they wish, and adding and/or modifying events.

For example, a manager may wish to be informed when a new case of unavailability is added to the schedule.
Visualising notifications
Dot: When a user logs on to the system, the dots indicate events which have been created or modified on the schedule of the resource.

List of notifications: You also have a list of all notifications from the Account menu-> My Dots.
Deleting notifications
To delete a notification, you simply need to open the task or the unavailability concerned by the notification.