
Event scheduling
Manage daily activities in the project planner: training, meetings, timeslots, external assistance calls. Whatever your field of activity, the software may be personalised to your specific scheduling needs.
On the schedule, an event is represented by a full colour rectangle.
Modification / Deletion / Event purging
Schedule wizard
"To Plan" panel
Managing recurring events
Multi-selection of events : Move, duplicate and other actions
Event duration
Event options
Creating events
There are various methods for creating events in your schedule:
Various ways of creating an event
-> Draw a rectangle in the schedule using a left click on the mouse
-> A simple left click: Left click in an empty place on the screen.
-> Click on the Add button "+" and choose "New task
The window below will be displayed:

Copy and Paste
Select the event and then click right followed by "Copy". Then place the cursor at the point where you wish followed by a right click and Paste. All information in the event will be saved.
Assigning an event to several resources
You are able to apply a one-shot assignment of a task to several resources! From the "Event" window, in the Resource field select several instead of "one only". The "Resource" tab is displayed from where you may assign all the resources that you wish - click on Save to validate your choice.

. Selecting only those resources that are available
When creating a task, you may select directly the available resources by ticking the box "Available" in the "Resource" tab.
. Selecting resources by department or by type
From the "Resource" tab you also have the possibility of filtering available resources by department or by type.
. Dissociate multi-resource task
You may disassociate a task assigned to several resources in order to assign the task to a resource independently from the others. To achieve this, choose the event and click right then select "disassociate".
Modifying an event
Different ways to modify an event
-> Double left click on the event
-> Right click then "Open"
Drag and Drop
Drag/Drop: drag and drop the event directly onto a new date and/or onto a new employee..
Splitting an event
By right clicking you can divide an event into 2.
Breaking down an event into complete days
By right clicking you can change an event lasting a period of x days into x events of 1 complete day. Please note that this action cannot be reversed.
Preventing event modification
Task locking
You may secure your tasks so that they may not be altered without your authorisation. Only the system administrator or the person responsible for security will be authorised to unlock tasks - by selecting "Unlock".
Prohibit event creation and modification
To activate this option, go to the menu Parameters-> Options -> General -> Prohibit the creation and modification of tasks prior to
->todays date
- a specific date
Forcing the creation of an event
When a resource is already taken
You may force the creation of an event even if the resource is already occupied or taken.
If you force the creation of the task, two tasks appear superimposed on the resource line in the scheduling space.
When the resource is not qualified for the task
You may force the assignment of a task to a resource without the necessary skills. You will receive a warning message. If you validate with OK, the task will be created.
To manage the rules for using the Force an assignment function, go to the menu Parameters -> Groups
Quickly modify data with a right-click
To save time, you can change the following information by right-clicking on the event:
- Task status
- Category
- Custom fields : Choice
Deleting an event
-> Right-click on the event then "delete".
-> Open the event and click on the "Delete" button
Event purging

It is advisable to purge data that is too old in the database, in order to improve the overall performance of your application and comply with GDPR standards.
Go to Tools - Options - Purge
Here are the different types of data that can be purged:
- Purge items prior to : Choosing the date
- History : events in the history prior to the selected date will be deleted
- Tasks: Tasks prior to the selected date will be deleted.
- Customers: Only clients linked to purged tasks, and only to those tasks, will be purged.
- Projects: Only projects linked to purged tasks, and only those tasks, will be purged.
- Unavailability: Any unavailability prior to the chosen date will be deleted.
- Context: Contexts prior to the chosen date will be deleted.
Schedule wizard
Search for the first available slot via the new scheduling wizard : A Scheduling Wizard panel, next to the hours, dynamically proposes the first available slot for selected resources.

"To Plan" panel
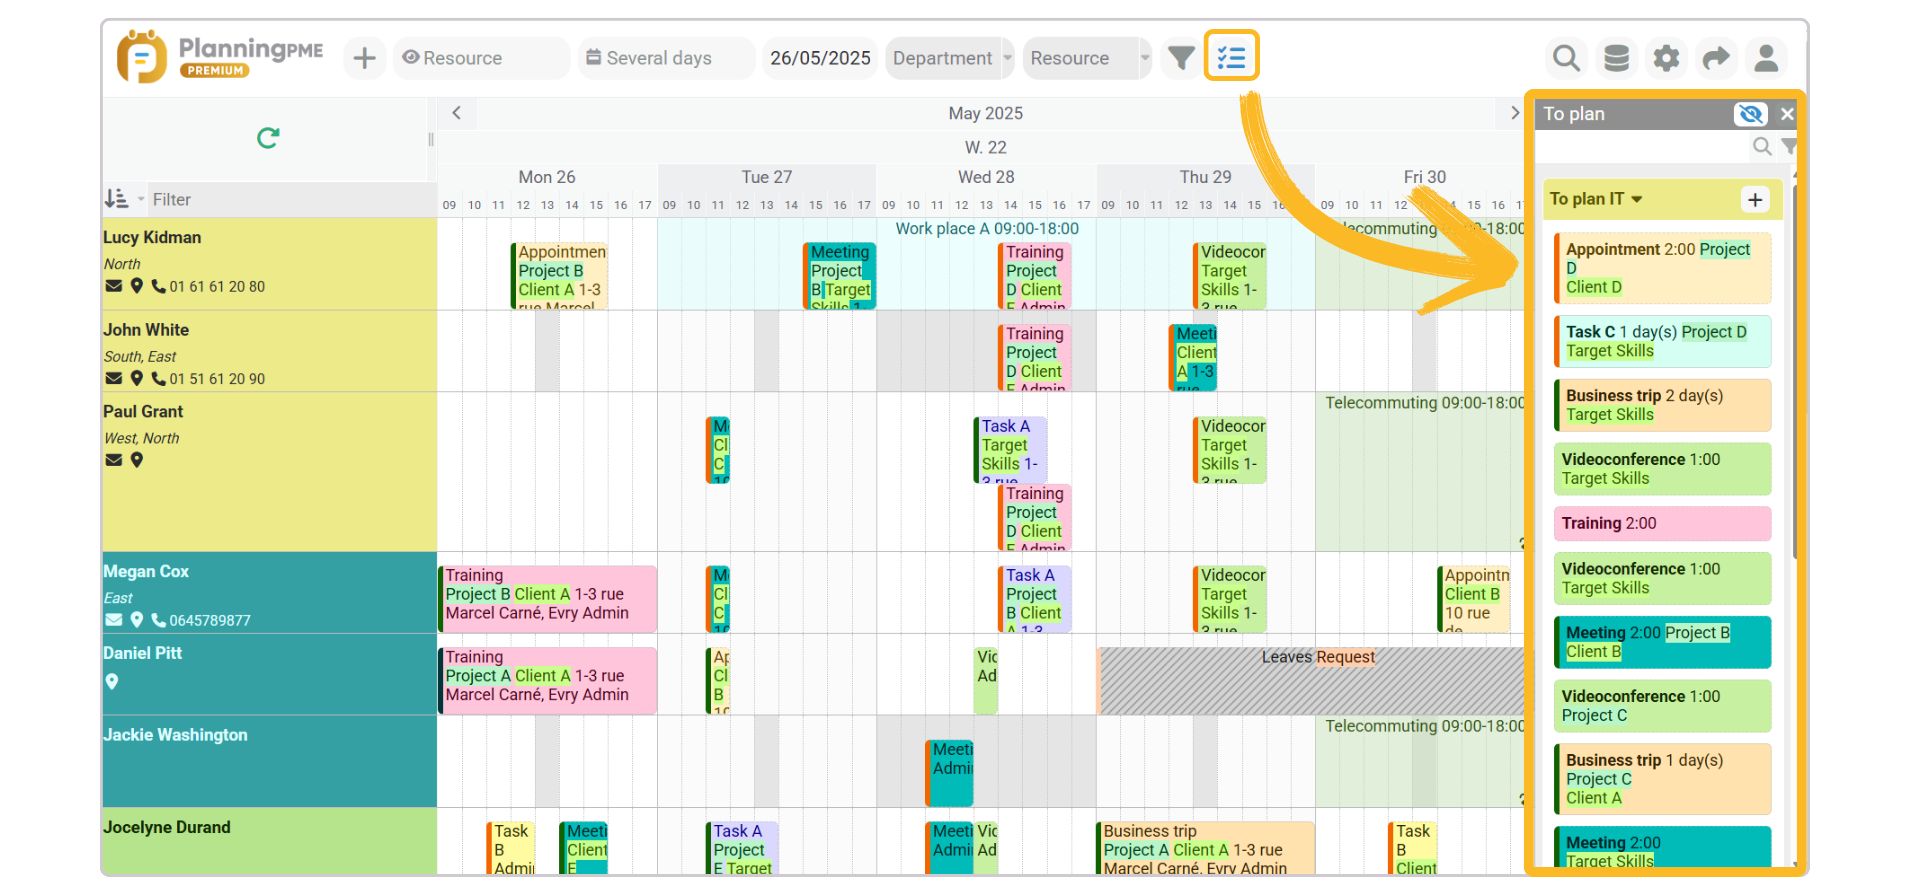
Description
You can find all tasks assigned to the To Plan resources in a panel on the right side of the schedule in the Resource, Task, Client and Project views. This panel makes it easier to assign tasks via a simple drag and drop on the schedule.
Show or hide the panel
![]() You can choose to show or hide the To Plan panel by clicking on this icon.
You can choose to show or hide the To Plan panel by clicking on this icon.
Hide To Plan resources
![]() This icon hides the "To Plan" resource lines on the schedule on resource view. This feature is very useful when the list of tasks to be planned is long.
This icon hides the "To Plan" resource lines on the schedule on resource view. This feature is very useful when the list of tasks to be planned is long.
Drag and drop
Task assignment is done directly via drag and drop onto the schedule.
Dedicated description
Customise the information displayed in To Plan tasks from the Tools -> Description -> Task - To plan menu.
Search bar
Filter the tasks in the "To Plan" panel by typing a keyword in the search field. The search will cover all event fields, including standard and custom fields.
Status and category filters
![]() This icon allows you to display the status and category filters.
This icon allows you to display the status and category filters.
Managing recurring events
A recurring event is an action which repeats itself at regular intervals. You may create a recurring event to save time. The "periodicity" function helps in managing monthly meetings, annual events, etc.

Creating a recurring event
When creating a task, click on the Periodicity button: The "periodicity" tab opens with various options:
Days: duration in days
Full day: a full-day task or for a few hours with start and end times to be determined
Periodicity: Daily, Weekly, Monthly, Annual. Dates: Enter the start dates and perhaps the end date and validate using Save.
Cancelling one occurrence or the full event series
You may cancel a single occurrence of the task or the complete series. For this, select the task and then right click on the mouse.
If you wish to cancel a single selected task, choose "This occurrence".
If you wish to cancel the full series, choose "The series".
Modifying an event within a series
Right click to leave the periodicity. You may now modify the event independently of the others.
Deleting recurrence from a set of events
See chapter below : Multi-selection of events
Multi-selection of events : Move, duplicate and other actions
Selecting several events
-> Hold down the CTRL key and click on each event you wish to select
-> Hold down the CTRL key and draw a rectangle around all the events you wish to select
After selecting several events, a dialog box appears. Several actions are then available.
Advance or delay selected events
By clicking on the double arrow, you can choose a number in hours or days, positive or negative. Then click on the "Confirm" button to advance or delay all the selected events. Note that it is impossible to undo this action.
Deletion of several events
Click on the delete icon in the multi-selection dialogue box.Please note that this action is irreversible.
Modify the category or status of tasks
Select "Task" events only. Click on the "..." icon and choose a category or state.
Modify unavailability status
Select "Unavailable" events only. Click on the "..." icon and choose an unavailability state.
Duplicate or move several events
- Duplicate You can duplicate a set of tasks across all schedule views (resource / task / client / project).
- Move You can move a set of tasks from one line to another in the schedule.
Deleting recurrence from a set of events
If the first element in the selection is a recurring event, then only recurring elements can be selected. Then, using the dialogue box at the bottom of the schedule, you can delete the recurrence from all the selected tasks using the "Get off the recurence" icon. The selection then remains active, and you can still use the dialog box to delete, move or change the status of the selected events.
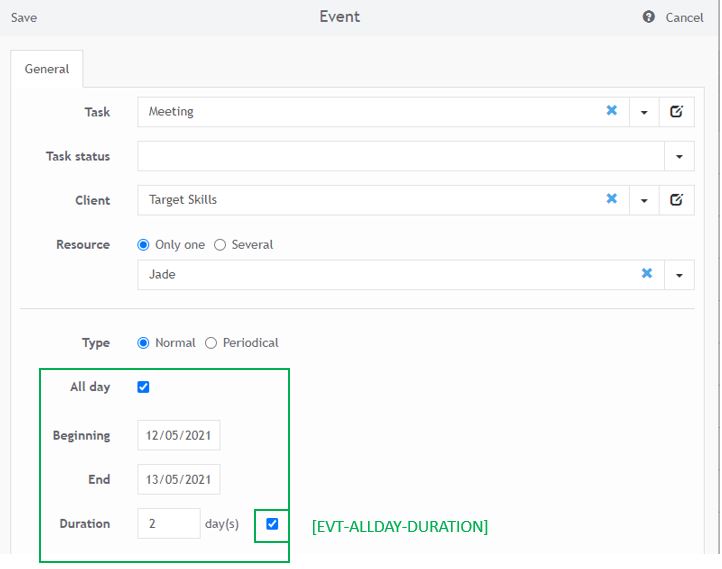
Event duration
All-day events or events in hours
Full-day events
For full-days events, the Full day box is checked. The event takes place over 1 or more full day(s) .
Events in hours
Events in hours are defined with a start time and an end time. The "Whole day" box is unchecked.
Assign a duration to your events
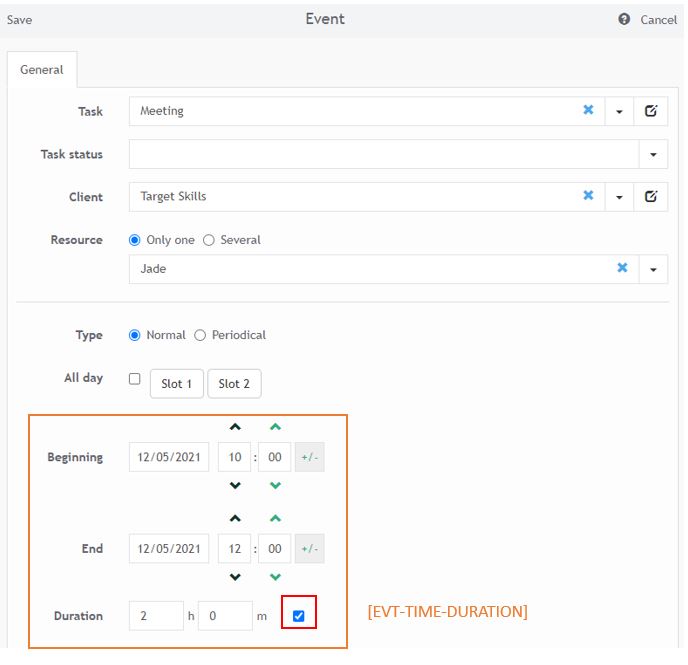
Calculation of the end according to the profile
For events with a specified duration, the end is calculated based on the resource's time profile.
Moving an event created in duration mode
- When we shift an event created with a duration, its duration is always respected and the length of the event is adapted live to the duration.
- An event in Duration mode switch to Time mode if it is resized with the mouse.
Multi-resources events
If an event is assigned to several resources with different time profiles, the reference time profile or calculations is the default time profile specified from the menu Data -Timetables
Calculating the event duration in hours and days
Cf. Calculating the event duration in hours and days
This documentation explains the logic of hours calculation used in the planning relying on several criteria such as the profile of the resource, the events in hours or days and so on.
Assign an allocation percentage
You can assign a percentage of allocation per event. On the schedule, a colour change indicates the percentage of allocation.
To enable this feature, go to Tools -> Options -> Event -> Display an allocation rate.
Event options
PlanningPME Web Access is a fully configurable online software suite. Initially it will appear very simple but will become more complex as you add options that you choose to activate from the menu: Parameters -> Options -> Task
Checking the availability of resources
To avoid scheduling mistakes, the application manages resource availability. If a resource is already occupied by a task or an unavailability, a red icon appears next to the resource.
To change this feature, go to Tools -> Options -> Event -> Assign one event to a resource at the same time.
You can set an additional restriction and have the alert message appear only if the resource is occupied by an unavailability by checking the "Show a warning only if an unavailability has already been assigned" option.
Checking the skills of resources
A "grey hat" icon appears if a resource does not have the skills required for a given task.
"Slots" button
To save time, you may create up to 4 different time slots within the window. When you click on one of these buttons, the defined slots will be assigned automatically. To define the slots, go to the menu Parameters -> Options -> "Slots"
Other options
Number of default resources
If you wish, you may choose to have one or more default resources per task. If you tick "Several", the "resource" tab will be displayed by default in the "Event" window.
Do not add any new labels
If you choose this option, all the new task naming labels that you enter when creating a new event in the schedule will not be added to the list of task labels in the menu Data -> Task.
Display the billing tab in the task
When you create a task, an additional tab - "Billing" - will be displayed.
Generate a pause
You may define a waiting-time pause when creating an event.
Auto-completion/intuitive data entry
Intuitive data entry is a function in PlanningPME Web Access whereby a list of suggested results is presented after having entered the first two letters of the word without the need to enter the full word.
This is a very helpful option when you have a long list of clients or projects - you have a simple data entry zone instead of having to consult a long list of names.
The number of labels appearing in the list presented may be modified by the system administrator from the menu Parameters -> Options -> General. You may modify the number of labels loaded by default