
Skills management
With online scheduling, manage your employees skills and assign them to specific activities.
How to assign skills to your resources
How to assign skills to your tasks
Verifying the appropriateness of skills
Filtering skilled personnel
How to create skills and skill categories
From the PlanningPME Web Access home page, go to the menu "Data" ![]() -> "Skills".
-> "Skills".

It is possible to create numerous skills and skill categories.
A skill category comprises several skills. For example the category Language comprises several skill such as English, French, etc.
To add a skill, click on the Add button (on the left at the bottom), then enter the skill name and select a category or create directly the category using the Pencil icon.
You may create as many categories and skills as you wish.
How to assign skills to your resources
Open the resource page and go to the Skills tab. Then, choose the skills of your employees by validating one after the other from the drop-down menu.

NB: You may filter the skills list by starting with the first few letters of the skill name.
How to assign skills to your tasks
From the menu Data -> Task, double click on the task name and then assign the associated skills from the drop-down menu. Assigning skills is handled in the same way in the tool as for resources.
Verifying the appropriateness of skills
Once the skills have been assigned to your resources and to your tasks, the PlanningPME Web Access scheduling software will check the appropriateness of the skills between the tasks and the resources. If you attempt to assign a task requiring a specific skill to a non-qualified resource a warning message will appear on the schedule. You will have the possibility of forcing the assignment of the task or not. NB: If you wish that users are unable to force such an assignment, this can be achieved with the appropriate initialising parameters using the menu Parameters-> Groups
Filtering skilled personnel
To subtract the competent people from the schedule, you may use the Skill filter to be found at the top of the screen.
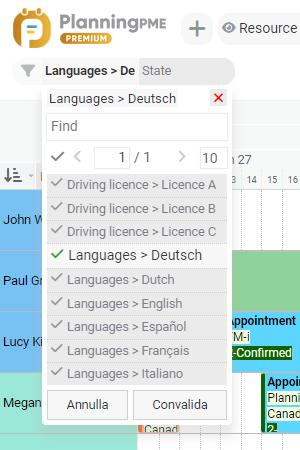
If you do not see the filter, it may be activated from the "Filter" Icon